- 4.1) Downloading problems and how to fix them
- 4.1.1) Latest loaders, WinLoad and "truncated macronames"
- 4.1.2) Problems arising because the DLDELAY= statement in your TM.cfg file is incorrect
- 4.1.3) Long file and directory names
- 4.1.4) Waking up the joystick
- 4.1.5) Programmable keyboards
- 4.1.6) BIOS issues
- 4.1.7) "Joystick not connected"
- 4.1.8) Hardware conflicts and gameport issues
- 4.1.9) TQS not detected
- 4.1.10) Forcing a download
- 4.1.11) Display colours for DOS loaders are incorrect, means ...
- 4.1.12) Runtime Error 200
- 4.1.13) Problems with files containing a "Brakes" macroname
- 4.2) Hardware problems
- 4.2.1) Joystick "spiking" - fixing the often talked about pots problem.
- 4.2.2) Joystick becomes disconnected in the Windows Game Controllers Calibration applet
- 4.2.3) Intellimouse conflicting with TQS
- 4.2.4) Problems with non US keyboards
- 4.2.5) "Keyboard not connected" - the PS2 connector issue
- 4.2.6) F22 Pro not accepting downloads, and generating characters
- 4.2.7) Stick won't accept downloads, and just spirals my aircraft all over the place.
- 4.2.8) TQS RNG and ANT knobs not working.
- 4.2.9) Resetting an F-16 FLCS when it seems to be generating rubbish, or not accepting downloads.
- 4.2.10) Resetting an F-22 PRO when it seems to be generating rubbish, or not accepting downloads.
- 4.2.11) S2/S4 button randomly going on/off.
- 4.2.12) Setting up a USB wheelmouse with the TQS
- 4.2.13) TQS throttle becomes disconnected when I touch a button on my joystick
- 4.2.14) TQS mouse buttons won't accept programming (T1, T11-14)
- 4.3) Miscellaneous points
- 4.3.1) Can you use an F22 Pro with the Suncom Throttle, and retain programmability for both?
- 4.3.2) How can I stop ripping the joystick off my desktop?
- 4.3.3) Where can we get replacement parts for our controllers?
- 4.3.4) Every time I go into Windows/Game Controllers, the 3-axis/4-button w/rudders configuration Status says "OK", but it keeps showing up in the Test window with the throttle axis missing. What can I do about this?
- 4.3.5) How can I uninstall Thrustmaster's ProPanel?
- 4.3.6) Problems with the Attack Throttle
- 4.3.7) How can I switch between different files residing in an F22 Pro?
- 4.3.8) Do joystick pots differ from ordinary pots?
- 4.3.9) Will an F22 Pro chip work in an F-16 FLCS?
- 4.3.10) Why can't I download to my TM controllers in Windows 2000/ Windows XP?
- 4.3.11) Do you need to install special drivers with TM joysticks?
- 4.3.12) I've accidentally disconnected some wires in the F22 - what order should they be in?
- 4.3.13) Do I need a speed adjustable gamecard to run my controllers off?
- 4.3.14) How do I put back together my TQS I just dismantled? I can't feel the detents anymore at all.
- 4.3.15) What's this I hear about new Digital chips for TM controllers?
- 4.3.16) Why do I see "jitter" from my controllers at the extreme ends of their travel?
1.) Basic principles, connections and getting everything working Right - you've just bought your new TM controllers, sat them on your desktop, you're feeling damned excited, and then you open up your manual and stare at the floppy disk in horror! Don't panic! Let's run through what you need to know to get you up and running quickly ... 1.1) How a programmable joystick works, and understanding the difference between analogue and digital devices Most joysticks on the market these days work in exactly the same way mechanically. Inside, they contain two potentiometers, or pots as they're referred to. If you have a radio/Hi-fi that has a knob on it that you turn to control the volume, what you're actually turning is a pot that varies its resistance as you turn it. In a joystick, these pots are connected to the joystick perpendicular to each other, to measure the left/right motion of the joystick, the x axis, and the forwards/backwards motion, the y axis. So a joystick has two principal axes along which it can travel, the x and y axis. The position of the joystick as you move it can be determined in terms of these 2 axes, ie. how far along the x axis the joystick has moved, and how far along the y axis. The pots therefore give a range of values as you move your joystick, and as such, they are termed analogue devices, as opposed to digital devices, which are either on or off, like the keys on your keyboard. A flight sim, via various Windows components, converts the values coming from the joystick, into the motion you expect to see when you're flying. We'll come onto the Windows components in a little while. A throttle works in exactly the same way - moving the throttle backwards and forwards changes the resistance of another pot, which your sim uses to adjust your thrust. So when we come onto how to setup your joysticks in Windows, you can see why now, if you only have a joystick, you tell Windows that you have a 2 axis setup, whereas if you have a throttle and a joystick, you tell it you have a 3 axis setup. Simple stuff. So, Thrustmaster joysticks behave in exactly the same manner as your cheapo bog standard joystick. The programmable side of these joysticks works very differently however. When you're flying, and you want to apply some airbrakes, you probably press the 'b' key on your keyboard. This sends a 'b' character to the computer, which your sim picks up, and it then applies the airbrakes on your aircraft. Now, all that a programmable joystick does is to mimic the keyboard. So when you press a button on your joystick that you want to behave as the airbrakes button, the joystick sends the 'b' character to the computer, and hence to the sim. The computer being totally stupid has no idea that the 'b' character has come from your joystick. As far as it's concerned, it thinks that it's come from the keyboard. Never ever make the mistake of thinking that computers are clever. A worm has more intelligence than a desktop computer. And some worms last longer as well. Now you'll understand why when you setup your joysticks, you have to plug the keyboard into the joystick first, and then plug the joystick (or throttle's) keyboard cable into the computer. That way, the computer has no idea where the characters are coming from. Mind you, I don't know where I'm coming from most of the time so I won't hold that against it. What we do then when we program a joystick and/or throttle is to tell them what characters we want generated for each of the buttons and hats on them. So unlike your bog standard cheapo joystick, you can't just connect these controllers to your computer and expect to have your controllers all singing all dancing. You have to create a file that assigns all the characters to the various buttons, (we call this programming but it's nothing like computer programming and anybody can do it), then we send this file to the joystick (or download it) and then the controllers are all setup for your flight sim.
1.2) Connecting up your controllers Ok - let's get your controllers wired up correctly - kind of important! Select your combination: F22 or F16 alone 1.) Take your keyboard lead from your keyboard and connect it to the keyboard connector on the joystick. You may need an adapter available for free from Thrustmaster depending on the keyboard cable's connector. Connect the joystick's keyboard cable to your computer's keyboard connector.
2.) Take the joystick port lead from the joystick and connect it to your gamecard/soundcard's joystick connector at the back of your computer. If you're using a TM ACM card, this is the right hand connector looking at the back of your computer face on (ie. you've turned the computer around so you're looking at the back of the computer.) That's it. F22 + TQS, or F16 + TQS 1.) Take your keyboard lead from your keyboard and connect it to the keyboard connector on the joystick. You may need an adapter available for free from Thrustmaster depending on the keyboard cable's connector. Connect the joystick's keyboard cable to your computer's keyboard connector.
2.) Take the joystick port lead from the joystick and connect it to your TQS throttle's joystick connector. Take the throttle's joystick cable and connect it to your gamecard/soundcard's joystick connector at the back of your computer. If you're using a TM ACM card, this is the right hand connector looking at the back of your computer face on (ie. you've turned the computer around so you're looking at the back of the computer.)
3.) Take your mouse lead and connect it to the mouse connector on the back of the throttle. Take the throttle's mouse lead and connect it to the mouse port on your computer. That's it. F22 + WCS 1.) Turn off the power to your computer
2.) Disconnect the keyboard from your computer, and plug it into your WCS.
3.) Connect the WCS 5 pin connector cable to the F22 PRO, and the keybaord cable from the F22 to your computer keyboard connector (you may need a PS/2 adaptor - be very careful to use a good adaptor, as these are not all made the same and commonly result in keyboard not connected problems).
4.) Connect the F22 PRO 15 pin connector cable to the Mark II WCS
5.) Connect the Mark II WCS 15 pin connector cable to your gamecard/soundcard.
F16 + WCS 1.) Turn off the power to your computer
2.) Disconnect the keyboard from your computer
3.) Connect the FLCS 5 pin connector cable to the keyboard port on the back of your computer. (You may need to use a PS/2 adapter)
4.) Connect the FLCS 15 pin connector cable to the Mark II WCS
5.) Connect the Mark II WCS 15 pin connector cable to your gamecard/soundcard.
6.) Connect your keyboard to the Mark II WCS and then connect the Mark II WCS 5 pin connector cable to the FLCS. Rudders Both the Elite and the older RCS rudders connect up in exactly the same way. Take your lead from the rudders, which has a Y connector on it, and connect it to the joystick connector on the back of your throttle, and then plug the joystick lead that was connected to this connector, and attach it to the free connector on the Y connector. The other way to do this is to connect the TQS to the rudders, and then the rudders to the gameport. Quickshot MasterPilot owners If you have Quickshot MasterPilot and you want to connect it to your TM controllers, attach it inline with the keyboard cable coming out of your joystick. So the keyboard cable from the joystick connects to the MasterPilot Programmer, the cable from the Programmer connects to the MasterPilot, and then the MasterPilot cable goes to the back of your computer into the keyboard connector. Now, in reality you should experiment with the order of connections with your MasterPilot, to see what does work and what doesn't for you. It's quite flexible in the order you connect it inline with your TM gear. Another connection method for example is: Keyboard to MP to MP Programmer to Joystick. On a sadder note, now that I've upgraded my machine to a 450, I've noticed that I'm no longer able to download files to my Quickshot MP. I've seen similar problems with other people's machines with this, and so I can no longer recommend the MasterPilot. Also, one thing you should be aware of is that although I had no problems with my older 166 machine, the 450 often boots up with the MasterPilot display looking damned weird. If you see this, don't leave your MP connected. If you do, you can fry the MP. I've fried one already. Instead, and you do this at your own risk, pull out the keyboard connector from the back of your computer, and then reinsert it. This fixed it for me. This is not recommended and I've been told by Bob Church that I risk frying my TM gear doing this ... eek! Also, you may find on faster machines that downloading to your TM gear with a MP inline becomes problematic. I'm sure this is because the MasterPilot has ridiculously long leads. (over 2 metres!). I'll experiment more with this when I have time and let you know what I come up with. At the moment then, the MP is off my system until Quickshot come up with a solution to the downloading problems. Damned shame. Especially with Falcon 4 around! People have reported that some machines running at a 100MHz FSB don't have problems with the programmer. Others have said that if you drop the FSB to 66, or run multiple apps in the background, then you can successfully download to the programmer. Anyway, I digress as this is meant to be a TM FAQ !! :)
1.3) Installing the Thrustmaster software, and downloading a test file Now, the one thing that horrifies everyone these days when they purchase TM controllers is the software that comes with them - on a single floppy, and it's for DOS. Don't worry about that - you'll see later that there are Windows apps that will give you what you were expecting. But all of these apps require that you've installed the TM software first, as they all talk to various components of the software. So, open up a DOS window, and install the software as per the instructions that came with your controllers. There's always some confusion as to which software to install if you've purchased a combination of controllers, so here's the golden rules: 1.) If you have an F22 PRO and a throttle, then you need to install only the F22 software, not the throttle software. It isn't used at all.
2.) If you have an F16 FLCS and a TQS, then you install only the TQS software. You don't need the FLCS software.
3.) If you have a WCS MkII and an F16 FLCS, then you only need to install the FLCS software. (Thanks Brian!)
4.) If you have a WCS MkII and an FCS variant, then install the WCS MkII software. Now, this is vital. If you have a Pentium II machine, you will need the updated software components from Thrustmaster, as it is likely that the software that came with your stick is out of date. Navigate to my TM Updated Loaders page and grab them now. In any event, it's worth looking to see if there are updated files for your controllers, as usually there are, and they make a big difference. Just swap the later files for those files in your Thrustmaster directory that are older. Before we go on, remember that this software is designed for DOS. That means, you cannot use long filenames for either the directory structures, or the files themselves. Everything has a maximum of 8 characters. Be warned - if you go changing the directory names or filenames and start putting in spaces or names greater than 8 characters, you're going to create major problems for yourself. Now, when you've installed the software, you run it via the batch file (a batch file has an ending .bat) and the batch file that you need to run will depend on what controllers you have. For example:
- F22 PRO owners (irrespective of what throttle you have) need to run the C:\Tm\F22\F22.bat file
- F16 FLCS owners need to run the C:\Tm\Tm.bat file
- F16 FLCS with a TQS owners need to run the C:\TQS\Tm.bat file
- 1.) Right click the mouse on your desktop (the main area of the screen). A menu pops up.
- 2.) Select the New menu item, and as another submenu pops up, select the Shortcut menu item. This pops up the Create Shortcut dialogue window.
- 3.) Use the Browse button to select the batch (.bat) file that runs the Thrustmaster software. eg. C:\Tm\F22\F22.bat
- 4.) Click the Next button when you've done that and give the shortcut a name, for example TM software.
- 5.) Click the Finish button and an icon appears on your desktop, that you can double click to start the TM software.
- 1.) F22 Pro joystick files end in .f22
- 2.) F16 FLCS joystick files end in .b50
- 3.) FCS type joystick files end in .adv
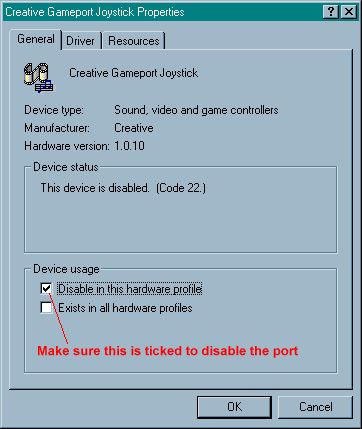
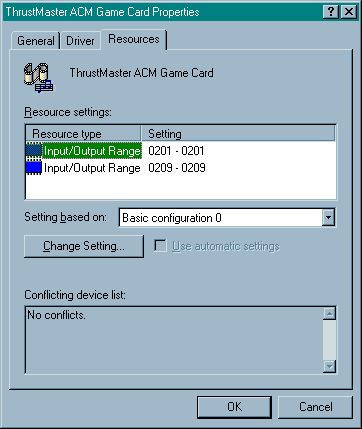
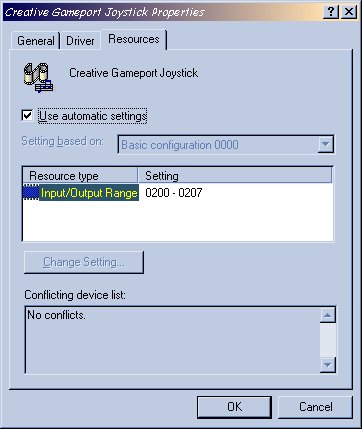
1.4) Setting up your controllers in Windows This has to be one of the most asked about issue on the net, so I'm going to cover this extensively. I'm going to start off with the gameport issue, as there's much confusion over this, judging from the plethora of posts related to it. 1.4.1) Ensuring that there's only one active gameport on your system There's two things you need to understand about gameports. The first is that you can only have one active gameport on your system - otherwise they'll conflict and you'll often get "joystick disconnected" messages, and you can hang your machine sometimes. The second is that TM controllers require that the joystick port has dual port circuitry. What follows here is an explanation from Buzz Hoffman in reply to a user wanting to know the difference between the connectors on a Soundblaster card, and those on the Thrustmaster ACM card. It explains this much better than I could, so I'll just save myself some hassle and reproduce it here: The Soundblaster connector is not a single port. It is a single CONNECTOR. All game cards (at least the ones you find now with one CONNECTOR are DUAL PORT game cards. DUAL PORT means it will handle: Port 1 (internal to the computer:)
Joystick 1 - x-axis (roll)
Joystick 1 - y-axis (pitch)
Joystick 1 - Button 1 (Trigger)
Joystick 1 - Button 2 (Normally a fire or programmed button unless supported in game.) Port 2 (internal to the computer:)
Joystick 2 - x-axis (mainly used for rudders now)
Joystick 2 - y-axis (mainly used for analogue throttle now)
Joystick 2 - Button 1 (aka Button 3) Programmed unless supported in game.
Joystick 2 - Button 2 (aka Button 4) Programmed unless supported in game. The ThrustMaster ACM game card is a Quad-Port Card. It supports two times as much as a dual port card - not many games use that feature. It has TWO CONNNECTORS and each support one DUAL PORT. Addresses are (default) port 201h, and port 209h. The bottom CONNECTOR on the ACM card supports this: Port 1 (internal to the computer:)
Joystick 1 - x-axis (roll)
Joystick 1 - y-axis (pitch)
Joystick 1 - Button 1 (Trigger)
Joystick 1 - Button 2 (Normally a fire or programmed button unless supported in game.) Port 2 (internal to the computer:)
Joystick 2 - x-axis (mainly used for rudders now)
Joystick 2 - y-axis (mainly used for analogue throttle now)
Joystick 2 - Button 1 (aka Button 3) Programmed unless supported in game.
Joystick 2 - Button 2 (aka Button 4) Programmed unless supported in game. All other cards you find with TWO CONNECTORS are still DUAL PORT, not quad port. They support this in the upper CONNECTOR: Port 1 (internal to the computer:)
Joystick 1 - x-axis (roll)
Joystick 1 - y-axis (pitch)
Joystick 1 - Button 1 (Trigger)
Joystick 1 - Button 2 (Normally a fire or programmed button unless supported in game.) Port 2 (internal to the computer:)
Joystick 2 - x-axis (mainly used for rudders now)
Joystick 2 - y-axis (mainly used for analogue throttle now)
Joystick 2 - Button 1 (aka Button 3) Programmed unless supported in game.
Joystick 2 - Button 2 (aka Button 4) Programmed unless supported in game. If you have not plugged in two - 2-button joysticks, or one Joystick with 4 buttons in the TOP CONNECTOR, then the bottom CONNECTOR supports this: Port 2 (internal to the computer:)
Joystick 2 - x-axis (mainly used for rudders now)
Joystick 2 - y-axis (mainly used for analogue throttle now)
Joystick 2 - Button 1 (aka Button 3) Programmed unless supported in game.
Joystick 2 - Button 2 (aka Button 4) Programmed unless supported in game. See, it was really simple after all. Just think of the normal cards with two CONNECTORS as a game card with a built-in Y-cable. Think of the ACM card as two complete DUAL-PORT game cards on one card. That can get confusing because people are always calling them CONNECTORS - ports.
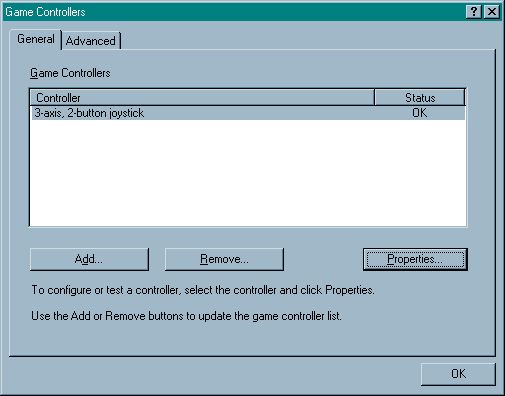
5.) Press the Properties button. the following window appears.
2.) Press the Add button.
3.) Now, to choose the correct joystick, these are the settings:
- If you only have a joystick, choose 2-axis, 2-button, joystick.
- If you have a throttle as well, choose 3-axis, 2-button joystick.
- If you have rudder pedals as well as the above, choose 3-axis, 2-button joystick.
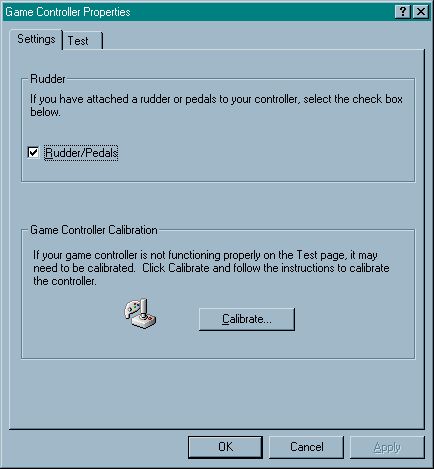
7.) Now all you need to do is to Calibrate your controllers, so press the Calibrate button and follow the on screen instructions exactly. When you're done, come back to the window above, and select the test tab, to check that everything is working.
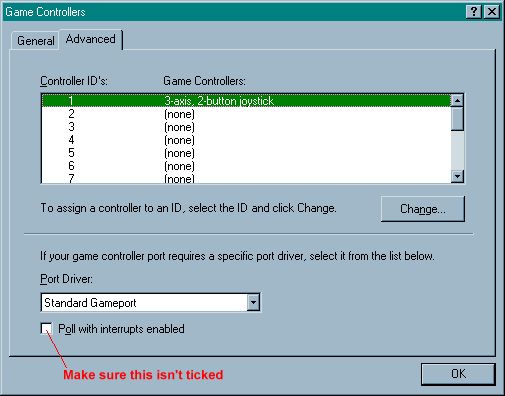
8.) Finally, select the Advanced tab and make sure everything on it reads as below:
2.) Working with other people's files, and creating your own By the time that you've got your controllers setup, and had a quick flick through the manuals, I'm sure the last thing on your mind is how to develop some files for yourself. You just want to get up there flying! Well, there are a lot of dedicated individuals out there on the net who've created excellent files that you can use straight away, so why not just grab them and use them for now. 2.1) Getting hold of joystick and macro files You'll remember that I said that files generally come in pairs: a joystick file and a macro file. It's also possible to put everything into a joystick file and not bother with a macro file. Personally, I don't recommend this approach for a whole host of reasons, but I'm telling you about it here now so that should you download a file that doesn't contain a macro file, you won't waste time frantically hunting it down. So, here are some sites where you can get files from:
- CVSCorp.com - an excellent resource for various TM files.
- Cowboy's Thrustmaster Users Group - files developed by Cowboy, who sadly passed away
- Thrustmaster Files by Doc
- Combat Flight Sim Joystick Files for FCS/WCS II files
BTN H1D KP2
BTN H1L KP4
BTN H1R KP6 Ok - this is too simple. Now I want to be able to start my left and right engines with the [ and ] keys respectively. I think I'll stick them onto Hat3 which like Hat1 can go up, down, left and right. I'll use the left and right aspects of its movements for this ... BTN H3L [
BTN H3R ] Hell, whilst we're at it, let's put some rudders (Left = , Right = .) onto Hat2 in exactly the same way .... BTN H2L ,
BTN H2R . Now wait a moment ... haven't I just "programmed" my joystick, so that I can start my engines, taxi and steer my way to the runway, add some brakes, take off and raise my undercarriage? And I did all this without ever having to touch the keyboard? Well, yes you have. Gettin' the idea? It's really simple. All those lines of text we created all get put together in a joystick file, which we download to the joystick to tell it what all the hats and buttons do in our sim, and then we fly in style. Here endeth your first lesson!
BTN H1D KP2
BTN H1L KP4
BTN H1R KP6
BTN H3L [
BTN H3R ]
BTN H2L ,
BTN H2R . We could take these keys that we've assigned to the hats and buttons on our joystick, and give them names. We call these names, macros. And we stick them in the macrofile like this (the macroname is coloured green): LookUP = KP8
LookDOWN = KP2
LookLEFT = KP4
LookRIGHT = KP6
EngineL_On/Off = [
EngineR_On/Off = ]
Rudder_Left = ,
Rudder_Right = . and then we could use these macros in our joystick file, like this: BTN H1U LookUP
BTN H1D LookDOWN
BTN H1L LookLEFT
BTN H1R LookRIGHT
BTN H3L EngineL_On/Off
BTN H3R EngineR_On/Off
BTN H2L Rudder_Left
BTN H2R Rudder_Right One of the reasons we do this is that it makes it so much easier to see what a hat or button does. There are a couple of important points that you should know about macronames. They cannot contain spaces, and you'll generate all sorts of errors if you try to download such a file. Also, if you're using the DOS loaders, then these loaders only look at the first 16 characters of a macroname, so don't use macronames longer than this. WinLoad does not suffer from this restriction by the way. Now, we need to tell our joystick file which macro file contains the macro definitions it is using. And we do this with the Define macro file statement (MDEF). Let's say that we've saved out joystick file as TAW.f22 and our macro file as TAW.m22. So, in our joystick file, we have a line that looks like this: MDEF TAW Note that it doesn't say MDEF TAW.m22. We don't put the ending (.m22) on. What else do we need in our joystick file? Well, there are a lot of other statements that are sometimes needed, depending on what hardware you have, whether you want to use the mouse on the TQS throttle, what rate we want to send the keyboard characters at to our sim to make sure it sees them all etc. Here are some lines that you may see in other people's files, and what they mean ....
| Statement | What it does | ||||||||||||
|---|---|---|---|---|---|---|---|---|---|---|---|---|---|
| REM | This is used for adding comments to your files, and tells the joystick to ignore any lines in the joystick file that star with REM.
| RATE 30 | How fast characters should be sent to the computer. You'll find that different sims on your computer will differ in how responsive they are to characters being sent to it from your controllers. A value of 30 means that characters should be sent every 30 milliseconds. You can put in what you want here for the value - I always start at around 60 and lower it until I see problems.
| USE TQS or USE WCS | Tells the joystick that you have a throttle and you want to use it.
| USE RCS | Tells the joystick that you have rudders and you want to use them.
| USE NOMOUSE | Tells the joystick that you don't want to use the mouse on the TQS throttle. This way, you can program the mouse knob on the throttle with statements as you would any other hat or button.
| USE MTYPE A3 | Tells the joystick to use the TQS throttle mouse to emulate your normal mouse, and the A3 part defines what buttons on the TQS are to act as the left and right hand buttons on a 2 button mouse. This means that you don't have to take your hands off the throttle to use your mouse when you're flying.
| PORTB1 IS TG1 | For an F22 PRO joystick, this tells it to recognise the Trigger as a standard analogue trigger as any other joystick's trigger behaves. You'll only need to use this statement for an F22 PRO joystick.
| |
Rem
Rem TAW.f22 by way of example
Rem
Rem################################################
PORTB1 IS TG1
MDEF TAW
Rem ---------------------------------------------
Rem HAT 1 is for views
Rem ---------------------------------------------
BTN H1U LookUP
BTN H1D LookDOWN
BTN H1L LookLEFT
BTN H1R LookRIGHT
Rem ---------------------------------------------
Rem HAT 2 is for rudders
Rem---------------------------------------------
BTN H2L Rudder_Left
BTN H2R Rudder_Right
Rem ---------------------------------------------
Rem HAT 3 is for engines
Rem ---------------------------------------------
BTN H3L EngineL_On/Off
BTN H3R EngineR_On/Off
And our macro file looks like this: Rem ################################################
Rem
Rem TAW.m22 by way of example
Rem
Rem ################################################
Rem ---------------------------------------------
Rem External views
Rem ---------------------------------------------
LookUP = KP8
LookDOWN = KP2
LookLEFT = KP4
LookRIGHT = KP6
Rem---------------------------------------------
Rem Engines
Rem ---------------------------------------------
EngineL_On/Off = [
EngineR_On/Off = ] Rem ---------------------------------------------
Rem Rudder control
Rem ---------------------------------------------
Rudder_Left = ,
Rudder_Right = . So now that we have our joystick and macro file, all we need to do is to download the joystick file to our stick, and we're off flying. It's that simple. Here endeth lesson number two!
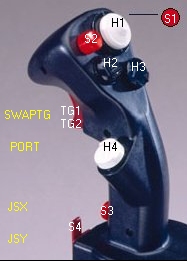
Eg. BTN T2 /P Chaff /R Flare /U, /M, /D Up, Middle, Down Indicates the position of the dogfight switch on your throttle. Allows you to assign different macros to a button/hat depending on the position of this switch.
Eg. BTN S1 /U AutoPilot
/M Request_Refuel
/D ILS /I, /O In, Out Indicates the position of the S3 switch on the F22 PRO or F16 FLCS. Allows you to assign different macros to a button/hat depending on the position of this switch.
Eg. BTN H1U /I PanUp
/O View_forward /H Hold The /H slash modifier essentially emulates a key being held down on the keyboard. It differs from the keyboard slightly, in that the key's 'make' command is sent once when the button/hat is pressed, followed by a single break code when it is released. In contrast, a held-down key on the computer keyboard will continuously send make codes for as long as the key is held, and then a single break code when it is released. One advantage of the method used by the /H switch is that other buttons/hats can be pressed without interrupting the button's/hat's macro following the /H modifier.
Eg. BTN S2 /H Airbrakes /T Toggle Steps through the macros on a button/hat each time it is pressed.
Eg. BTN T5 /T Request_recovery /T ILS /T Gear_down /A Analogue Forces the button/hat to act as an analogue device. Note that F22 PRO users should use the PORTBx IS statement instead.
Eg. BTN S2 /A
Eg. PORTB1 IS S2 DLY(x) Delay Forces a delay between macros. The value for x is in milliseconds (1000 = 1 second). Note that this is in addition to the overall rate at which characters are sent to the computer determined by the RATE command.
Eg. BTN T6 HUD_refuel DLY(60) Request_refuel DLY(60) Weapons_Cold
- KP/ to AUX/
- KPENT to AUXENT
- INS to AUXINS
- HOME to AUXHOME
- PGUP to AUXPGUP
- DEL to AUXDEL
- END to AUXEND
- PGDN to AUXPGDN
- UAROW to AUXUAROW
- DAROW to AUXDAROW
- LAROW to AUXLAROW
- RAROW to AUXRAROW
- USE FCLK
- USE RCSPRO
- USE BLANKER
- USE RCS
- USE TQS
- USE WCS
- USE MTYPE NONE
- USE MTYPE Bx
- USE MTYPE Cx
- USE NOMOUSE
3.) Common errors in files There are a lot of problems that I've seen in mine and other peoples files, that tend to crop up often, so I thought that as and when I see them, I'd add them here. After all, many of these can frustrate you no end, and you can spend a lot of time trying to sort them out. There's one thing in my experience that has become almost a golden rule: If when you're downloading and compiling a file, and you get an "Error reported at line x", and when you goto that line you can't see anything wrong with that line, start looking at the lines before that line. So many times, I've found that it's previous statements in the file that are actually responsible for the error. So just keep that in mind to stop yourself going crazy! What I'm not going to do here is to cover those errors that are well documented in your manuals or the help file for your development app. So if you're trying to use the /H modifier with a /I modifier, and you get an error, well, I'm afraid you do need to spend time with the manual. Anyway, here are some common problems. I'll add to this section as I see more problems posted by users. 3.1) Button S3 problems with the F22 PRO and F16 FLCS If you're using /I and /O slash modifiers, which rely on the position of button S3, then add the following line to your joystick file, and don't put any other functions onto button S3: BTN S3 Rem Leave this as it is If you don't have this line, you'll get some very strange behaviour from many of your hats and buttons, that can seem quite random. You should have this line in all your joystick files whenever you create them. 3.2) F22 PRO trigger doesn't work in a sim Add the following line to your joystick file near the top, to tell the joystick that you want the trigger button to behave as a normal trigger button, controlled by the sim: PORTB1 IS TG1 3.3) Joystick disconnected message with rudders connected If you've recently added rudders to your system, then it's essential that you remove any digital rudder statements from your files. These look like this: RDDR a series of characters and then add the following line near the beginning of your file: USE RCS It's also obviously important that you've setup Windows correctly to add the rudders. remember, you don't set them up as a 4-axis 2-button joystick. See section 1.4.2) Windows settings and calibration.
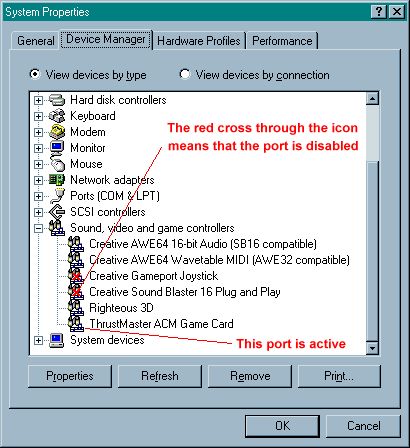
4.) Troubleshooting Now with all aspects of computing, well .. hell ... life, the more complicated something gets, the more things there are that can go wrong. So let's look at some of the problems you may encounter ... 4.1) Downloading problems and how to fix them Here's a checklist of just about everything I can think of, and like me, it's in no particular order. I'm going to assume here that there aren't errors in the files - we're talking about physically being unable to download to your controllers .... 1.) Make sure you have the latest loaders:
- MK2LOAD.EXE - V8.13
- B50LOAD.EXE - V5.18
- F22LOAD.EXE - V2.09
External_view_fsDOWN = F2 and assign them to buttons Hat1 up and Hat1 down like this: BTN H1U External_view_fsUP
BTN H1D External_view_fsDOWN then you will find that although these macros are different, they'll be seen as the same by the DOS loader, as the first 16 characters (External_view_fs) are identical. So a keytest will probably see F1 being generated by both Hat1 up and Hat1 down. On top of this, if you use the TM C&CC software, it will truncate the macros in the joystick file accordingly to read this: BTN H1U External_view_fs
BTN H1D External_view_fs This will still compile OK with the DOS loader, because it'll only look at the first 16 characters of any macroname. If you now load up these files with the truncated macronames into Fox Two, you'll get an error on downloading/compiling with WinLoad. The error arises because Fox Two and WinLoad are not restricted to this 16 character limit on macronames. So, the External_view_fs macro in the joystick file will not be seen as the External_view_fsUP macro in the macro file. These are therefore not bugs in Fox Two or WinLoad as some people have suggested. Just develop your files in Windows apps and you'll have no problems. I urge you not to use the TM C&CC software, and if you're using the DOS loaders, keep your macro names to 16 characters or less. 2.) Adjust the DLDELAY= value in your TM.cfg file. there is an excellent explanation of this and other downloading issues in Bob Church's tmdsktop.zip file on his site. 3.) Make sure that the file and the directory it sits in do not have file names longer than 8 characters. So C:\TM\F22\F22Progs\F15.f22 is OK, but C:\Thrustmaster software\F22\F22Progs\F15 joystick file.f22 will cause download errors. 4.) Try waking up your joystick first by pressing button S1 a few times before downloading (but not during downloading.) 5.) Some programmable keyboards are not compatible with TM controllers – try a cheapo bog standard keyboard and see if that makes a difference. 6.) The BIOS on some motherboards is known to cause some problems. Make sure you have flash upgraded your BIOS to the latest version, and contact Thrustmaster for more help if this doesn't fix it. 7.) Just check that Windows Control Panel's Game Controller's applet doesn't show your joystick to be disconnected. See the section on setting up your sticks in Windows to sort this one out. If they were previously, just check that if you have rudders connected to your system and that you're using them as default analogue rudders, that you don't have a digital rudder statement in your files - this will often cause a joystick disconnected problem. If this occurs, then clear your stick’s memory, or reset it. Do this by turning off your machine, rebooting, and using one of the TM utilities to clear/reset the stick (f22clear.exe/f22reset.exe for the F22 Pro). Note that a warm reboot doesn’t always work – turning your machine off is often more likely to clear the problem. 8.) Make sure there are no conflicts in Windows with your keyboard and other ports, especially gameports. See the section in this FAQ on how to disable other gameports on your system 9.) If the button lights flash in TMS or the Control Panel when you try to calibrate an FLCS or F22, it's because it's looking for a TQS and there's not one out there. Also characterised by very slow key response. This happens a lot when people are trying to find some problem and pull the TQS out of the system to check things out. To fix this, you need to get rid of the USE TQS statement in your joystick file and B50THROTTLETYPE=TQS (THROTTLETYPE=TQS for the F22 TM.CFG file) from your TM.CFG file. 10.) To force a reload of the slave file into the WCSII, you just need to delete the file MK2LOAD.DAT from the directory where the B50LOAD file is located. That will trigger a WCS reload on the next download, assuming the B50 file or TM.CFG calls for a WCS. 11.) If any of the loaders comes up with white text on a blue screen, in all probability it's not finding the TM.CFG file. There are colour settings in TM.CFG that set the yellow on gray screen format. It's not a problem in and of itself, but it means the loader isn't getting DLDELAY and that causes lots of problems. WinLoad doesn't care about DLDELAY, but it still needs to be set for F22Setup, F22Clear, B50Cal, etc. to work properly. 12.) There is only known cause of a 'Runtime Error 200' in the loaders and that is definitely fixed with the 'Pentium' versions. If the new versions are installed and the error still occurs, the C&CC isn't finding the right loader. 13.) Many people have commented on the fact that if you have a macro in your macro file, whose name is Brakes (eg. Brakes = b), then this causes a problem on downloading. This is fixed in the updated loader, B50LOAD V5.18, so if 'Brakes' produces an error, you need to update your loader - download it from the Thrustmaster Customer Support Library, or use Winload. You should only see this in the 5.16 version of the loader. That included stuff to support the RCS Pro toe brakes, as the line to enable them was to be USE BRAKES. When that went in, all the 'Brakes' macros started producing errors, so Bob Church changed the keyword to USE RCSPRO.
4.2) Hardware problems 1.) Joystick spiking - or how to fix the "pots problem" properly. Here's a common complaint ... "When I'm flying my plane, I move the joystick ever so slightly, especially near the central region, and my bloody plane banks violently to one side. Landing and refuelling are a complete nightmare." Now there are a lot of reasons why this may be occurring, and you ought to check out the Thrustmaster Customer Support Library to see what they have to say. The easiest cause to sort out is that you haven't calibrated your joystick correctly. If this doesn't fix it, and you're definitely running your stick of a dual port gameport, then I'm afraid your pots may be the problem. You can analyse these pots in detail in Foxy's joystick analyser, and if you already have Foxy installed, download Foxy's Controller Analyser version 1.1 (FCA.zip 31.3Kb) which is an updated version of this part of Fox Two. Use these Joystick analysers to see what your joystick is up to, especially the zoom menu item if you're suspecting spiking around the central position. You've really got 3 options here: 1) Send your stick back to TM to get it checked out and repaired if necessary.
2) Squirt some oil into the pots, wiggle your joystick around furiously, and then drain off the excess oil. Doesn't always work but does for some people, and of course is very easy to do. However, I recommend the next option only.
3) Replace/fix the pots. This is the preferred option, and it's easy to do, even for those of you who are not mechanically inclined.
4.) Use the updated CTFJ to smooth out the jitter if the spiking isn't too serious. Right, now as far as I'm concerned, here's the definitive way to fix the pots problem. I have investigated this pretty thoroughly, tried many techniques, and this one really will work. The way we're going to do this is simple: We're going to remove the pots from the stick, leaving the wires attached to them, then we'll take them apart, clean them, ensure even and good contact, test in Foxy's joystick analyser or FCA, reassemble, and have a beer. You might want to start off with the beer first though. These recommendations apply to the F22 and F16 sticks, and I have done these to both sticks, so I know what I'm taking about. Off we go ... 1.) Leave the computer switched on. Have Fox Two running, or FCA. We're going to use these.
2.) Remove the 4 rubber feet off the base of the sticks. This will reveal the screws that attach the base of the stick to the body.
3.) Remove these screws using a Philips screwdriver, and the base, to reveal the innards of the stick.
4.) Now stop. Fire up Foxy's joystick analyser, and move the joystick around. Watch what happens in the analyser, and watch what's going on in the stick, to see how it works. You can see the two pots inside the joystick. They're the round gold things, with 3 pins sticking up from them, with wires connected to these pins. They have a metal shaft coming out of them, onto which is attached a little toothed gear. This mates with a toothed part of the main joystick housing. Moving the joystick results in the pot's shafts rotating. Before you take the pots out, take a very good look at the arrangement of these toothed parts. It's important that when you replace them, that you replace them so that for the full deflection of the joystick, these teeth always meet and hence the pot's shafts rotate as well. Let's get at them then.
5.) Important point: Do one pot at a time.
6.) Now getting at these pots depends on what joystick you have. The pots are very easy to get at in the F16, so if you have an F16 FLCS, then just push the joystick intowards the base, and you'll see the plastic sliders lift that house the pots. And then you're straight at them. Remove one of the only, and go straight to part f). Note that when replacing the pots, that there's a little arm that fits into a hole on the sliding plastic part. You must make sure that these mate together, otherwise the pot will rotate when you move the joystick. If you've got an F22, which seems to suffer from pot problems far more than the F16 FLCS, then here are the instructions ... F22 Pro:
a) Turn the joystick up the right way, as though you were using it in a sim. Remove the 2 allen screws (you need to use an allen key size: 1/16th inch) from the top of the joystick's base, that are above the pot you want to remove. It'll also make your life easier if you remove the 2 allen screws directly opposite these 2 you've just removed as well. Put them some where safe.
b) Turn the joystick over once again so that you're looking inside the joystick. You should be able to lift up the metal right angled brackets that are now loose. They won't lift up very far, but just a little.
c) Lever off the plastic toothed gear. Note which way it goes onto the end of the shaft. That's important. You may need to rotate the toothed gear away from the teeth its mating against of the main joystick housing, to be able to prise it off the end of the pot's shaft. When it's off, and it takes a bit of levering, have a look at it. Note that the shaft that they were on is cut away to fit the shape of the inside of this gear. It's obvious as you look at them, but make a mental note of it now. Don't worry if you didn't .. it'll be obvious when the pot is out of the stick which way round they go, so you can practice then.
d) With the gear off, you should see a nut on the inside of the metal right angled bracket holding the pot tightly in position. Unscrew this, and the pot will become loose.
e) You can now pull up the angled bracket, making it easier to pull the pot away from it.
f) Now fire up Fox Two's joystick analyser, and rotate the shaft. You'll see the analyser's cursor moving around. Note that the cursor goes from the edge of the screen to the opposite edge of the screen only whilst the pot is rotated a little way around its central position. In other words, if you rotate the shaft from one extreme to the other, there's only a small part of the rotation that's being translated into actual "joystick" response. That maybe surprising at first to you, but it makes sense, because you'd have to move each axis of the joystick around an angle in excess of 270 degrees to get full pot movement! See some spiking? Let's fix it then.
g) First off, look at the pot and the way it's parts fit together. You can see that there are four clasp arms that hold the top of the pot onto the base of the pot. Note which way round the top of the pot fits onto its base. In particular, look inside the pot through the small gap beside the 3 arms with wires soldered onto them, and look at the arrangement of the metal contacts inside the pot. Rotate the pot's shaft to view them properly. Make a mental note of what this looks like.
h) Use a flat headed screwdriver, lever up the 4 clasps holding the top of the pot onto its base, and remove the top of the pot.
i) Take the pot apart. You will see the resistive black coating arranged in 2 circular patterns, with gaps in them, on the flat disc in the pot. There's grease on this disc. Remove all of this grease with a soft tissue. Remove it as well from the metal contacts that slide along the resistive coating. Ignore the fact that Fox Two's joystick analyser now says that the joystick is disconnected. Apply a sparingly thin layer of a vaseline to the disc. You don't need to use anything else. It's non conductive and it'll do the job perfectly. Just make sure that you use very little. Anything more than a tiny thin film will trap dirt and particles that could have a detrimental affect on the pot's behaviour/lifetime.
j) Now, reassemble the pot making sure that everything's in the right place. Do not at this stage recrimp the four clasp arms that hold the top of the pot onto the base of the pot. Hold the pot together with your fingers.
k) Restart up Foxy's joystick analyser. If you get a "joystick disconnected" message, you're either not squeezing the pots tightly together, or you've reassembled it incorrectly. Fix this, and then restart the analyser until you no longer see the message.
l) Now rotate the shaft of the pot, and look for any spiking. If there isn't any, then we're ok to recrimp the four clasp arms that hold the top of the pot tightly onto the base of the pot. When you've done this correctly, you should not be able at all to move the top of the pot around underneath these clasp arms. If there is spiking, see whether the spiking gets worse the looser you hold the pot together. It is more than likely that it will. Take the pot apart again, and bend up the metal contact arms so that the make a better contact against the resistive coated disc. Reassemble and repeat this stage until the spiking disappears. If the spiking definitely doesn't go away, and you're sure that you've setup your sticks correctly as mentioned earlier in this FAQ, including importantly that you're disabled the "poll with interrupts enabled" checkbox in Windows Game Controllers applet, then you're probably in need of some new pots. This is pretty unlikely. I have a lot of pots here, and I've got them all working properly with this trick of bending up the contact arms after cleaning away all the grease from the pot. Reassemble the pots.
m) All we have to do now is to replace this pot, and do exactly the same to the other pot, and we're done. If you never bothered to see how the toothed gear fits on the end of the pot's shaft, now is a good time to practice, as it's a fiddly job inside the stick. Notice that there's only one possible way to get it to fit so that it becomes flush with the end of the pot's metal shaft.
n) OK - reinsert the pot back into the stick, into the right angled metal bracket.. Pass the nut that you previously removed down the shaft of the pot, but don't screw it on yet. Add the toothed gear so that it slides down flush, and get it mated properly with the main teeth of the joystick. This is a tricky and fiddly affair, so be patient. Or just do what most of us do and lever the damned thing back into position with a large flat headed screwdriver. Now, tighten up the nut that holds the pot securely against the right angled metal bracket.
o) Replace the allen screws and make sure that both right angled brackets are flush with the metal housing. Tighten up the allen screws.
p) Do the same for the other pot and you should be rewarded with a perfect response from your stick. I know this looks like quite a big job, but that's really only because I've really gone into detail with the instructions. Just keep a clear head, look before you undo things, and you'll be fine. It's an easy and very rewarding job. It's a pain that these joysticks don't all ship in perfect order, but they're easily fixed, and the small effort is majorly worth it. On a slightly different but related note, Cowboy’s site (Thrustmaster Users Group) discusses fixing the pots problem by using an analogue bypass solution. I've actually done this to my F22, purely out of curiosity, to see what effect it would have. My personal experience is that it did not fix the spiking I was seeing from my stick, although many others have reported that it does. Nor would I expect it to if the source of the spiking lies within the pots themselves. I therefore do not recommend following this line of action before first cleaning out the pots as described above. Don't get me wrong, I'm not saying that you shouldn't do this to your sticks, but if the response from a pot isn't as it should be, it doesn't matter what you do after the signal emerges from the pot - if the pot's to blame, you fix the pot first. Here’s an interesting post from the newsgroups which may just be worth checking on for your system. While this might not be true for you, just in case... Creative's Sound Card updates are notorious for installing updated VJOYD.VXD files. If you are using this driver then you will get spiking with almost any joystick. It is not the joystick's fault... It is the drivers... How do you check? Go into the control panel, and in the System/Device Manager/Sound, Video, and Game Controllers/Gameport Joystick/Properties. Find the name of the "Provider". If it is Creative or Creative Tech, you're a victim of this... If it says Microsoft, then the driver is correct, and you are the victim of voltage problems in your computer... Good luck resolving this, because unless you can return the whole machine and all associated hardware, you'll have a very hard time finding the culprit... Pulling all cards MIGHT make the problem go away... but it will not give you an accurate assessment of what exactly is to blame... I've seen MONITORs screwing up the joysticks, due to ground voltage leakage... Plug ALL of you devices into the SAME power strip, even speakers! Make sure that you use the power cord keys on non-grounded power cords... and... good luck... I've been there many times... 2.) Joystick becomes disconnected in the Windows Game Controllers Calibration applet This is a common sighting for many people, so let me cover this here. There are several reasons why your Windows says that your joystick is disconnected. They are:
- You haven't connected your controllers and keyboard together correctly.
- Your PS2 adaptor isn't compatible (note that a lot aren't).
- You have an incompatible BIOS/Motherboard (very very unlikely these days)
- The pots inside are losing contact (very common - see above as to how to clean out and fix the pots)
- The rivets on the pots aren't providing a good enough electrical contact
2. Connect TQSM with COM2 and download a setup with an A1 mousetype statement into the FLCS/TQS.
3. Start Win95's hardware detection, manually add a serial Logitech mouse, and reboot.
4. Check the device manager. You will most likely see a conflict message next to the Logitech mouse. Now disable (not delete!) the MSWM in the device manager. Shut down PC and unplug the MSWM.
5. Boot the PC and immediately press S1 on the FLCS to activate the TQS mouse. Now, your TQSM should work fine as the mouse used by Windows. 6. Check the device manager, doubleclick on the Logitech mouse and reinstall the drivers.
7. Reboot.
8. Shut down PC and plug in the MSWM.
9. Boot the PC, press S1, and let Windows 95 automatically detect the MSWM. Now, both mice should work fine, except for the wheel on the MSWM.
10. Check the device manager. There should be three mice now, one Logitech, one MSWM, and one disabled MSWM. Now delete the disabled MSWM.
11. Reboot. Even though both mice work fine, the wheel on the MSWM doesn't work yet because, when installing the Logitech mouse, Win95 automatically put the standard mouse options in place of the MS Intellipoint software that activates the wheel functionality on the MSWM.
12. Reinstall the MSWM drivers from the installation disk that came with the MSWM. This will get your wheel functionality back without having any effect on the TQSM.
13. Reboot and enjoy a fully functional TQS alongside your wheel mouse.
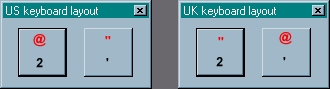
BTN H1D @ REM This generates a "
BTN H1L SHF ' REM This generates a @
BTN H1R " REM This generates a @ So, the lesson to be learnt with this is that if you have a non US keyboard layout, have a look on your own keyboard where the character is that you want generated, and then use the SHF x syntax to ensure the correct character is generated, where x is the non shifted character underneath on your own keyboard. Here's an interesting e-mail I had from Bob Church, regarding changing the default keyboard layout to a US keyboard layout.... "It's not necessary to change to an American keyboard. It's enough to switch the keyboard to the US Character set during the download. There's a key combination, something like CTL-ALT-F6 that will do that, I can't recall right now exactly what it is. Seems to me there was also a utility that let you switch keyboard character set to US. There were several of them, all started with 'KEYB', like KEYBUK for British layouts. I don't think the switch is necessary with WinLoad, though. As I recall, the problem with the European keyboards only occurred while the F22 was trying to determine which programs were already in the memory and Winload doesn't bother with that at all." And here's another .... "On the 102-key European boards, there's an extra key over next to the left shift key. The RAW code for it is #61 for Make, #F0 #61 for Break. It comes up now and then. Since the key has no equivalent on the US keyboard, it can only be generated with a RAW code, there is no ASCII character that you can put in the file to cause it to be sent." Thanks for these Bob! 5.) Keyboard not connected - the PS2 connector issue I've received various e-mails about problems with keyboards connected through the F22 not working. This is a post from the newsgroups that suggests a cure ... "To all reading my previous help posts, I've finally solved my problem in getting the keyboard to work with the TM F-22 Pro stick. The symptom was that the BIOS would not identify the keyboard when plugged through the F-22 Pro. As Revved had suggested - the problem was with the stupid little AT/PS-2 plug adapter that TM set to me. I knew this adapter "looked" problematic. In fact, it was the first thing I looked after - I called TM and asked them to send me a new one. I haven't gotten it from TM yet. In the process, I tried to find many other solutions, to no avail. After reading recent posts (yesterday) and hearing Revved's experience, I decided to go and buy another adapter today (from CompUSA). That was it! Wow, what a relief!" I picked up my connectors from a cheapo computer sale, and have had no problems with them, so you don't need to get the ones that TM supply (but which aren't included with the stick). So hunt around and see what you find. They're not all the same. Some have the central "key" incorrectly positioned. Also other users have said that the contacts in these connectors weren't properly sited, or were too short, and hence weren't connecting properly with the computer's or the stick's contacts. Thanks for pointing this one out to me guys - this will save a lot of people a lot of hassle! 6.) F22 Pro not accepting downloads, and generating characters This is something I've seen myself a few times, and something that many people have contacted me over. One of the reasons for this odd behaviour is when a file has been downloaded to the stick that is incompatible with the Thrustmaster hardware connected to your system, or the file contains an error which can set it into a loop. I've also seen it on perfectly good files and in those instances, I'm at a loss to explain why it happens. Anyway, here's one solution .. this may take a few goes to get it to work, but it will 9 times out of 10 give you a way back into the sticks. Here we go then. 1.) Turn off your machine and wait for a bit .. attach the F22 ONLY to it. Not the TQS.
2.) Turn it back on and do NOT touch the stick at all .. do NOT wake it up.
3.) Boot into DOS.
4.) At the DOS prompt type:
CD c:\
CD c:\TM\F22
F22clear.exe
5.) Reboot your machine
6) Go into Foxy and download this file (calibrat.f22) into it.
7) Now see if that works.
If that doesn't work, repeat all the above except instead of running F22clear.exe, run F22Reset.exe
Don't forget that after running the F22Clear.exe or F22Reset.exe, you should wake the stick up after that. (You wake the stick up by pressing button S1 a few times). Also, if you Reset the F22, you'll need to recalibrate it, and the TQS if you have one attached. By this, I mean recalibrating using the TM DOS software, as the RNG and ANT knobs will have lost their calibration values. When calibrating these knobs, it's vital that you've downloaded a file that contains correct ANT and RNG statements that will generate characters. The calibrat.f22 file above has these statements in. 7.) Stick won't accept downloads, and just spirals my aircraft all over the place. If you're sure that you've properly calibrated and setup your sticks as outlined elsewhere in this FAQ, and that you have compatible PS2 connectors that aren't causing the problem, then maybe, and I really do mean maybe, one of the wires inside the stick has come loose. Take off the base by removing the screws located underneath the rubber feet, and look around. You may need to solder them back on. When soldering, remember to either use flux or fluxed solder, use a wide tip, wait for the soldering iron to get really hot, and hold it against the contact you're soldering, and bring the wire and solder to it. You don't hold the soldering iron against the solder and melt that onto the contact. 8) TQS RNG and ANT knobs not working. This is a very common e-mail I receive, so here's what's going on. I'm going to assume that apart from this, your stick and throttle work fine .. that they're correctly setup in Windows, you can download to them, and you can use them in your sims. If you can't, then you need to read through the earlier sections in this FAQ to correct this. The commonest reason why these knobs don't work is that they're not calibrated. I'm not talking about being calibrated in Windows. I'm talking about not being calibrated from the TM DOS C&CC app. To do this, you must first ensure that a file has been downloaded to the stick which has statements in it for the ANT and RNG knobs. Why? Because the calibration routine only works if the knobs generate characters. If they don't, there's no way the calibration routine can calibrate them, but no error will show so you'll think that you've correctly calibrated them. It's also vital that you have no digital throttle statements in your file by the way .. if they're there, they can really lock up the sticks, and you'll need to revisit section 4.2.5 to get out of this. Anyway, load up the TM C&CC (there's a button on the toolbar in Foxy for this) ... it can run in a Window or full screen .. it doesn't matter. Press 'K' to goto the calibration window, and then follow the instructions implicitly. These are the windows you should be using: Press K in this screen:
ANT 2 9 1 2 3 4 5 6 7 8 9
RNG 2 9 a b c d e f g h i This will fix it. 9) Resetting an F-16 FLCS when it seems to be generating rubbish, or not accepting downloads. This is a very common e-mail I receive, so here's what's going on. Let's say that whenever you press some of the buttons on your F16 or TQS, you get continuous or characters you wouldn't expect to see generated. This also applies to people who've tried to download a file containing a digital throttle statement to a setup consisting of an FLCS and a TQS setup as a 3 axis 2 button system. The first thing to do is to setup your controllers as a 2 button 2 axis joystick in Windows. Now reboot your computer (sometimes it helps to actually power off your computer, wait a bit and then power on again) and then boot up into DOS without waking up your joystick. That's the secret here. If you wake up your joystick, you wake up the problems associated with it. If you don't know how to boot up into DOS, use TweakUI of PowerToys (downloadable from many many sites - freeware) to get it to display a bootup menu before booting up Windows. Anyway, now that you're in DOS, download a simple file to your stick that only has statements in it for your stick. Let's say the file is called calibrat.b50. Just navigate to your TM (or TQS) directory and download the file like this: CD\
CD TM
b50load.exe C:\TM\PROGS\calibrat.b50 Now reboot back into Windows, setup your stick again as a 3 axis 2 button joystick (if you have a throttle) and you should be fine again. 10) Resetting an F-22 PRO when it seems to be generating rubbish, or not accepting downloads. This is a very common e-mail I receive, so here's what's going on. Let's say that whenever you press some of the buttons on your F22 or TQS, you get continuous or characters you wouldn't expect to see generated. The first thing to do is to reboot your computer (sometimes it helps to actually power off your computer, wait a bit and then power on again) and then boot up into DOS without waking up your joystick. That's the secret here. If you wake up your joystick, you wake up the problems associated with it. If you don't know how to boot up into DOS, use TweakUI of PowerToys (downloadable from many many sites - freeware) to get it to display a bootup menu before booting up Windows. Anyway, now that you're in DOS, you've got a few options here. The first I'd try is to clear the stick's memory, using F22clear.exe. If that doesn't work you can then also reset your F22 with F22RESET.exe (you should remember though that this will require you to recalibrate your TQS ANT and RNG knobs - see the section in the FAQ that explains this). Then finally download a simple file to your stick. Let's say the file is called calibrat.f22. Just navigate to your TM/F22 directory and download the file like this: C:
CD\
CD TM\F22
f22load.exe C:\TM\F22\F22PROGS\calibrat.f22 Now reboot back into Windows, and you should be fine again. 11) S2/S4 button randomly going on/off. I had this in from a user so if you're seeing this problem, have a look down this avenue ... "I found out another reason why the S2/S4 button problem (randomly going on/off) might occur. I know that it might happen when TQS commands are put in a file while no TQS is selected.
This evening, I was helping a cousin of mine installing an F22 Pro. It suffered from the same problem (using the f22test.f22), so we tried removing everything TQS-related (the T button defs, the RNG and ANT defs and the USE TQS and MTYPE statements) however still no go. We discovered turning up the RATE a lot (60 or more) would help... after some more fiddling (he uses an Asus TX97E board) we discovered the typematic rate in the BIOS was set to automatic. When we set this manually to the lowest possible value for delay time and highest possible character rate, all worked fine, even when RATE was set to 0." Thanks to Jan-Albert "Silver" van Ree for this gem :) And here's another reason why you may see this ... "If you're watching it in the Game Controllers applet and they're just flashing on and off randomly, then it's likely that the stick thinks there should be a TQS out there and you don't have one. First check the file you downloaded for a line that say USE TQS. If you find that, delete it. Next, if you're using the standard TM loaders, look in the TM.CFG file for a line that says "THROTTLETYPE=TQS" or "B50THROTTLETYPE=TQS". If you find one, delete it, too. If you're using Fox2 and WinLoad, check the options in Fox2 and make sure they aren't set to use a TQS. Once all that's done, download the file again and see if it works any better.
After I disabled that 'THROTTLETYPE' entry in the TM.CFG file all worked fine (I already had deleted the 'USE TQS' entrys in the .F22 files right after I read Your FAQ)." Thanks to Martin Bädeker and Bob Church for this! 12) Setting up a USB wheelmouse with the TQS. Jan Mandler just sent me this little gem. If anyone has a problem with mice conflicting with your TQS throttle, this guy for my money has done more testing of this than anyone else out there, so over to you Jan ... "The easiest way to use the TQS mouse in conjunction with a wheel mouse is to get a USB mouse. I recently added a MS Intellimouse Explorer USB to my system. Now, the Intellimouse Explorer is my primary mouse on the USB, while the TQS mouse is connected to serial port one as a standard serial mouse. Installation is straightforward and does not require such hassles as the Serial and PS/2 or Serial and Serial approaches mentioned elsewhere in this FAQ. First, install the USB mouse as advertised. Make sure it works properly on its own and reboot the systems. Then connect the TQS mouse to a serial port of your choice and load up an .F22/ .B50 file that defines your TQS mouse as a standard serial mouse (USE MTYPE A1). Make sure the serial port is active (I usually disable all unused integrated peripherals in the BIOS in order to save IRQs) and start the hardware autodetection feature of Win98. Let Win98 search for non-PNP hardware. It should find the TQS mouse as a "standard serial mouse". Accept it, reboot, and you're good to go! I did some tests to see if the serial, "slow" TQS mouse had a negative impact on the high frequency updating of the USB mouse. Luckily, this does not seem to be the case. While the TQS mouse, when moved quickly, shows the "drag" and stutter typical for serial mice, the USB mouse remains unaffected (at least from what I can tell on the screen). I disabled and enabled the TQS mouse a few times to see a difference, but the fluidity of USB mouse movement remained the same with and without the TQS mouse. If there should be a difference, it is not noticeable." 13) TQS throttle becomes disconnected when I touch a button on my joystick. This is a common post in the newsgroups, usually associated with a setup that has previously worked, but now stops responding. A very common cause is if you have downloaded a set of files to your HOTAS that contain a digital throttle statement, and yet you've told Windows to see the throttle as an analogue throttle, ie. 3-axis, 2 button joytick setup. To fix this, you have to download a file to your stick that doesn't have a digital throttle statement in it, or tell Windows you want to use a 2 axis, 2 button joystick setup. To do the former, then reboot (or you may find you need to turn off your computer totally), then let Windows reboot without touching any of the buttons on the stick. What you don't want to do here is to "wake up" the joystick. Then download a file to your stick that doesn't contain a digital throttle statement. With an F22, you might want to try clearing the stick's memory, and you may find that to do this, it's better to boot to DOS or open a DOS window, and run F22Clear.exe. Remember that if you decide to run F22Reset.exe instead, you'll need to reload a calibration file into your controllers, and use the DOS calibration routine that's part of the TM C&CC to calibrate the RNG and ANT knobs. Once you've downloaded a suitable file, you should be up and running again. See the topics entitled Resetting an F-16 FLCS or Resetting an F-22 PRO for more details. 14) TQS mouse buttons won't accept programming (T1, T11-14) This post in the newsgroup says it all .... "I have a Thrustmaster FLCS and TQS combination. Everything works fine except for the little red cursor button. Although I have had the TM stuff for ages, I have never before had the requirement for this button. I would like to assign keyboard codes to the T11-T14 buttons (don't want to use it as a mouse) but when I try that it does not give me any output at all (although the little button next to it works). I have tried it with and without "USE nomouse" specified in the .b50 file, and tried to assign all sorts of keys to these buttons but to no avail." And here's the solution ... use a different mouse plugged into the throttle. I recommend just getting hold of a simple Microsoft 2 button mouse for the job.
4.3) Miscellaneous points 1.) Can you use an F22 Pro with the Suncom Throttle, and retain programmability for both? I had this e-mail in which pretty much says it all (and a bit extra *grin*). "I just got done loading the SPI up again with a program and it works just fine. No functionality on either the F-22 Pro or the SFS is lost by having them both programmed to emulate keystrokes. The SFS works both ways, programmed by the SPI or manually as it was before the SPI was made and distributed. As far as the throttle action it works as it always has, through calibration in windows game controllers. Let me add a thanks for all your hard work on Fox 2. I've only been a TM user for 3 days and because of the great help documentation in Fox 2 I've been able to build my own macro and joystick files already. Previously I was pretty confused as to exactly how TM gear was programmed. Great work! Take care. - Coug" 2.) How can I stop ripping the joystick off my desktop? OK, hands up - how many people in the heat of a dogfight have found themselves panicking as a bandit turns onto your six, and your joystick is in your hand suspended about 6 inches off your desktop? What a nightmare! Well, there are several ways of keeping it there. One of the best I've come across is to use velcro. The first TM stick I had was a PFCS, and with it came 2 velcro strips which you stuck down onto your desktop, and another two you attached to your stick. It was a superb system, and I never ripped the stick off my desktop with it. I thoroughly recommend it. Another way is to use Blue Tack (I'm not sure what you call it in your respective countries, but it's that stuff you use to put up posters on a wall). It works pretty well, unless it gets warm, in which case it is useless. The advantage with it is that if you're constantly fiddling inside your stick, it's a convenient way to be able to fairly easily remove your stick from your desktop. Some people drill holes through the baseplate of their sticks, and then bolt the thing to a suitable surface. Dramatic but effective! Finally, here's one I had from one of you guys ... this just about takes the cake! :) "Hey doc, I thought I would send this along to you to help others that have a problem with the F16-flcs or the F22 moving on their desk in the heat of battle. If you are lucky enough to have a desktop made of metal and covered with formica, and you also have a Thrustmaster F22 then you are half way there. All you have to do is get 4 high energy magnets and place them on the sheet metal base by each foot pad. The weight and the pull of the magnets to the desk will firmly anchor the stick. Now if you have the F16-flcs or the TQS all is not lost! You will need some superglue and some epoxy in addition to the magnets. Lightly sand the magnets and the areas of the base of the joystick. Now clean the sanded areas with some glass cleaner or the like and apply a thin layer of the superglue to all the areas you have cleaned and sanded. Let the superglue harden and then mix the epoxy and apply it to the surface of the magnet. Now invert the joystick and place the magnets to the preped base. Use tape to hold them in place until the epoxy sets up. But what good does this do for me, I have a wooden desk top? You have 2 options!
1) You can cut into the desktop and epoxy steel disks into the desktop.
2) You can cut in from the bottom of the desktop and place the disks just below the surface. Magnets can be used here as well as long as you keep the poles in the proper orientation I.E. NORTH to SOUTH.
A note here, be sure that you know where you want the joystick to be while you play. Machine shop rules apply "measure 3 times and cut once". This part is work and to do it right will probably require that you invert the desk. Note that this is not a job for the non mechanicaly inclined. If more elaboration is required, then you might think about not attempting this!
High energy magnets? Where do I get them? I got mine from an old hard disk drive. Not the stepper motor kind but the modern voice coil style. A sacrifice in the name of high performance gaming. The other way is to do a search on the net for magnets (copy and paste this into the Altavista simple search and this should get you to a dealer. <+magnets +sales +distributors> You want either/or "rare earth" or "ceramic". If you can afford it get the magnet with the highest energy you can as it will have greater holding power.
Good luck and as always "FOX 2 RULES!!!" You can direct questions/coments to: mikeiver@iname.com." Cheers for this buddy! 3.) Where can we get replacement parts for our controllers? Guillemot/Thrustmaster are supplying kits that you can purchase online containing spare parts for those who are keen to refurbish their controllers themselves. This is a quote from their site: "To provide customers with the best possible service, after-warrantee support will be offered to Thrustmaster customers. From now on, when wear and tear affects a product after the warrantee has expired, customers can extend the life of that product by repairing it themselves. Customers will be able to go on-line at www.thrustmaster.com and purchase spare parts kits for a nominal price. Thrustmaster will make the repairs easier for the customers by providing clear descriptions of the simple procedures on the on-line Support Page." If you're after triggers, switches and hats, then I picked up this snippet from Jan in the newsgroup. For triggers, you will need to buy a new Omron B3F switch, type 4050 or 4055 (4050 needs 1.27 Newton and 4055 needs 2.55 Newton. I would suggest 4050 so the internals of the stick aren't stressed too much. For those of you wondering... FLCS and F-22 Pro hats use 4 Omron switches also B3F type, but with a 6*6 mm house instead of the 12*12 mm house used for trigger/buttons. Probably serial 100,1002 and 1005 (again, different force, 0.98 , 1.47 and 2.55 Newton). Omron has a website at http://www.omron.com, that should help you find a dealer nearby." There's also another site containing information on replacement F-22 Pots. Here's the link: F-22 Potentiometer Replacement. If you're after RCS springs, then try shooting an e-mail to David Bilenkey ((dbilenkey@sympatico.ca). He contacted me in February 2009 to inform me that he has RCS springs available. I've had an e-mail from Dennis Carr in October 2009 with the following useful information: For those using the Thrustmaster RCS (rudder control system) you know that the weak point on these pedals is the main spring (known as a torsion spring). I have been using my pedals for 15 years and average about 5 years on a spring. Recently my last spring from TM broke. As TM does not support these pedals anymore I was having a hard time finding a replacement. For those in the same situation I found a solution. A company called W.B. Jones Spring Company (http://www.springsfast.com/) manufactures custom springs in small quantities. I had five springs made up for a total cost of $82.00 out the door. These springs are equal to if not better than the TM provided springs. If you wish to order springs from them here are the specs: Wire Diameter: 0.135
Type of Material: music wire
Inside Diameter: .625
Relationship of Legs: 180 degrees
Number of Coils: 2
Length Leg #1: 2.25
Length leg #2: 2.25
Direction of Wind: right hand
Finish: plain
Yes, I know this seems expensive for springs, but five should last around 20 years of usage. If you are like me and don't care for the feel and spacing of other rudder pedals out there then this is a viable option. Hope this helps others! 4.) Every time I go into Windows/Game Controllers, the 3-axis/4-button w/rudders configuration Status says "OK", but it keeps showing up in the Test window with the throttle axis missing. What can I do about this? Over to Bob Church on this one .... "Go by my website (The StickWorks) and pick up the FIXAXIS1.ZIP file, run that little utility and see if it helps. If not, follow the link to the Logitech page and get the ClrCalib utility they've got there and try that. The thing with the missing axis usually happens because WinLoad gets out of sync with the Control Panel, the 3-Axis stick gets flagged internally as a 2-Axis. Windows doesn't really care what it's called, but the flags say it has no throttle so it gets reported as a 2-Axis. Probably a good idea to look in the \Program Files\StickWorks\CTFJ3 directory and delete the file CTFJ.DAT, too. Once all that's done, go back and reinstall the 3-Axis, should be okay. When you download a digital throttle program with WinLoad, it changes the flagging to 2-Axis to avoid the 'Not Connected...' message. I think what happens is that if you go in and calibrate, then apply, while the system is in that condition, the 2-Axis flagging gets 'saved' in the backup calibration data for the 3-Axis stick. From then on, when you install a 3-Axis, it picks the bad flagging up from the registry. The Control Panel only looks at the flagging, not the type, so it sees a 2-Axis, reports it as okay, but when you go to Calibrate or Test, there's no throttle bar. Fun stuff *grin* !!" 5.) How can I uninstall Thrustmaster's ProPanel? Goto your Windows\System directory and delete the TM.cpl file. 6.) Problems with the Attack Throttle There are at present no plans to cover the Attack Throttle in this FAQ, as I do not have one - anyone who owns one and wishes to add a section to the FAQ is more than welcome. However, my recommendation is to purchase the TQS throttle if you have an F22 Pro or F16 FLCS. It is much better. I've had several e-mails regarding the Attack Throttle, and I have to reply to them all saying that I cannot offer any help - I know nothing about them. I am not intending to get hold of one either. So please do not send me any e-mails asking for help regarding it. Your best bet is to try the newsgroups or various hardware forums. This is an e-mail I had recently: Since writing and after reading your web pages I was able to program my F22 Pro and use it playing Raptor. I was still having problems with my Attack throttle so I called Thrustmaster for the third time. Each time I have called I started describing my problem with "I have a F22 Pro, a ACM game card and a Attack Throttle". This time the tech on the other end stopped me and asked if I said an attack throttle. When I replied yes he stated that he had never been able to get the attack throttle working with a F22 Pro stick and that I should have purchased the TQS. He was very apologetic that neither of the previous two techs had identified the problem, and was receptive to suggesting to Thrustmasters management that they should make some statement to compatibility between their products. Also suggested was that a non-programmable keyboard was needed to prevent programming problems. I've also just had this one, so this may help a lot of you ... The trick is to connect the F22 and Attack Throttle properly in sequence and sometimes it just takes some patience - the attack throttle might not find the stuff for a while. Got me to desperation for a while and after trying all possible combinations found the !only! one working. Here's what I have: Game Port : ---> Attack Throttle <----+----> Elite Rudders
....................................................................|
...................................................................+----> F22Pro <----------- Keyboard Works well with ACM card & normal multi I/O. Of course you need to run attack throttle activator first and then calibrate. You can even program the 22 through the attack throttle, although I don't care for it. (Thanks to Tony Przygienda for this.) And finally one more ... Hey, Fox 505 (and all the rest of you out there having problems with the Flight Control System setup [Attack Thr, Topgun stick & Elite Ruds]) I may finally have a fix. The guys at Thrustmaster sent me this and it took care of all the problems I was having with the jet randomly rolling violently left and switching views. They said: "All our digital joysticks have a potential problem with certain gameports in combination with certain games. Basically, if DMA channeling is being used by the game to access the sound card, the sound card functions can cut out the gameport for these digital sticks." OK here's the fix: 1. Go into the "MultiMedia" control panel.
2 Click the "Advanced" tab at the top.
3. Click the + next to "Audio Devices" NOTE: (There will many times be multiple items under here, check ALL of them)
4. Double click on the first device listed under "Audio Devices".
5. Is there a settings button and is it available or greyed out?
5(a). If it's greyed out, move to the next item listed under "Audio Devices" and repeat. Continue until you find the right one, or you run out.
5(b). If it's available, click on it and look for the checkbox labeled "Single Mode DMA" or "Single DMA Channeling". If it is there, check it. 6. If you checked the box, click OK, then "Apply" if available, then click OK again, then "Apply" if available, then OK. Now restart and you now have a good chance of getting it working. If none of these devices have settings, or none of them have "Single Mode DMA" then there are two possible resolutions; play your games that have problems without sound or buy a SoundBlaster. One quick way to check is to go through almost the same procedure as above. 1.Go to the "MultiMedia" control panel.
2.Click the "Advanced" tab at the top.
3.Click the + next to "Audio Devices" NOTE: (There will many times be multiple items under here, check ALL of them)
4.Double click on the first device under "Audio Devices." Double click on the first device listed (do not check for the settings button). On the window that comes up look for a prompt for "Use Audio Features on this Device" and "Do not use Audio Features on this Device". Check the "Do Not use", click Apply and OK. Restart and no game will use sound now. If it works in the game now then same thing, buy a new sound card if there's no Single-mode DMA." 7.) How can I switch between different files residing in an F22 Pro? You can't directly. If you try to download a file that's residing in the F22's memory, then that file will be selected and the download won't occur. There's no way to do it directly as such. I have to say that with flight sim files, these tend to get very large and hence there's usually only enough memory in the stick for one of these. 8) Do joystick pots differ from ordinary pots? Yes, they do. The pots are special in that the entire active area of the potentiometer is included in about the middle 70 degrees of pot rotation. Most sticks do that since the typical pot rotates 270-300 degrees but the stick can only move it 60-70 degrees. Other than that they're pretty much standard pots with a resistance of 100k or so. Finding pots with the narrow active range off-the-shelf is pretty difficult, they're usually built-to-order by the stick manufacturer. 9) Will an F22 Pro chip work in an F-16 FLCS? In most cases yes, (earlier versions are a little different). The chips will convert the F-16FLCS into a full blown F22 Pro, as there's little difference in the circuitry. If you do this, just leave the download switch on the F-16FLCS's base in the Run position. 10) Why can't I download to my TM controllers in Windows 2000/ Windows XP? If you have the original chipset in the F22/FLCS/TQS etc. etc., then there's no way you can download to the controllers directly under Win2k or WinXP (but see below for a method using a virtual PC installation. The easiest solution is to download to the controllers either via a DOS boot up disk or to set up a dual boot operating system, and download outside of Win2k/XP. Once downloaded, you can still go and use the controllers within Win2k/XP. Of course, users with F22s, FLCS and TQS controllers can purchase Bob's digital chips and then use his Win2k/XP drivers. An interesting question was raised on the Foxy forum as to why this was the case - why you could use the controllers once programmed, but couldn't actually download to them. Well, over to Bob Church on this one .... "They work once they're programmed because they look like a keyboard to the PC. The stick just sends keystrokes into the port itself, the PC can't tell the difference. On the other hand, the programming requires that the driver write to the keyboard port to transfer the program out into the stick. Win2K/WinXP won't allow direct access to the port except by the driver that owns the port (the system keyboard driver). Even then, the access isn't really direct, it does a WRITE_PORT_UCHAR which is really a call to a routine in the HAL and that routine eventually does the actual write to the port. Since you can't get around the keyboard driver that owns the port, the only way to maintain the rather critical timing of the keyboard writes would be to replace the keyboard driver with one that you could send the whole program to and let it time the writes to the HAL. Then, if the call to the HAL didn't screw up the timing too badly and if none of the other system threads preempted your keyboard driver at the wrong moment, the data might transfer okay. Even if you wrote the driver and could work around the timing problems, though, I'm not sure Windows would let you replace the keyboard driver. There's a rule against replacing system components, I think that Windows System File Protection would likely just restore the original and toss the new driver out. Anyway, it's more work than it's worth to try to find out. There are Win2K drivers for the digital chips, you can always get a set of those. :) There's an interesting solution to this though as posted on the Check-Six forum. Thanks to Cool-Hand (aka: VonDerKool) for this solution - Translation by Guillaume, James and babelfish.altavista.com :) "There's now a way to program your original TM HOTAS controllers (F-22 PRO, F-16 FLCS, TQS, etc.) under XP. You can use Winload and download without needing to reboot into Win98/ME/DOS for the download. What you need to do is to install VirtualPC or VMWare and install Win98 or WinME in the Virtual PC they create. Then with your new Virtual PC, it's a simple matter of downloading within that. Once downloaded of course, your controllers will work just fine within XP and you won't need to have the Virtual PC running. Please don't e-mail and ask me for help or information on this - I haven't tried it as all my controllers are digitally upgraded. Thanks :) 11) Do you need to install special drivers with TM joysticks? Nope, they use the generic Windows joystick drivers. See earlier in the FAQ on how to setup your controllers in Windows. 12) I've accidentally disconnected some wires in the F22 - what order should they be in? With the stick upside down, keyboard and gameport cables away from you X axis pot:
On the PCB from left to right
Blue - Green - Yellow
On the pot (top to bottom)
Blue - Green - Yellow X axis pot:
On PCB top-bottom
Purple - Grey - White
On pot (left - right)
Purple - grey - white 13) Do I need a speed adjustable gamecard to run my controllers off? No you don't. I've run TM gear off a SB AWE32 and a SB Live, with no problems whatsoever. Many people run their controllers fom the gameport on their soundcards, and have no problems with them. Of course, some people will always have problems :) 14) How do I put back together my TQS I just dismantled? I can't feel the detents anymore at all. I saw this post in the newsgroup by Lizard Jockey, and I thought it would be a good idea to have it in the FAQ. The Detent is just a series of notches in the rotating mechanism (Large Drum) with a follower that rubs on the drum creating the stops. The Detent Tension Adjustment is an arm with a small Shoe resting on one end that rubs on the same mechanism (back side of drum as viewed from the open bottom). The arm protrudes out from underneath the rotating drum toward the opposite side of the case from the card and should have a small Wheel fixed to the end which sticks out through a slot in the case which permits adjustment by rotating it. It is very easy to dislodge the Arm and its Shoe which mates with the rotating drum - be careful! The Arm is large and not likely to be missed. Keep in mind, you won't feel the Detents working until you have ALL 4 Screws around the Drum in place and LIGHTLY Tightened. The other 4 screws just keep the corners closed. As for Timing the Pot to the Throttle Arm, there is a slot in the drum as you probably have already noticed which the Blade on the end of the Pot Rotor fits into. You could start with the rotor somewhere close to centered in it's travel and with the throttle arm somewhere close to the middle of its swing and try it. Keep making half turn adjustments until it works correctly. The correct mounting position for the Housing of the pot is with the side with the wires Facing the Card. With the Pot in place in the Case as mentioned above, the Uppermost Ear on the on the Pot should have the Brown Wire, The next Ear Down (Middle) should have the Gray Wire and the Ear Furthest down in the Case should have the White Wire attached to it." 15) What's this I hear about new Digital chips for TM controllers? Bob "Sticky" Church has developed new chips for the F22-Pro, F-16 FLCS and TQS that convert your controllers into superb digital controllers. For more information, goto his site, and read the article I wrote for CombatSim (http://www.combatsim.com/htm/nov99/TMdigital.htm). 16) Why do I see "jitter" from my controllers at the extreme ends of their travel? The jitter is always worse at throttle min, joystick full back or full right. Those are the high-resistance ends of travel and they become more susceptible to the noise there. This is eliminated with Bob Church's Digital Chips.
5.) Getting help There are a lot of us out the net who'll help you with all aspects of Thrustmaster related issues. I would check out Frugal's forums (but they're currently often down) or SimHQ forums. As well as this, I maintain a list of links on my site (James's Thrustmaster Links) that should prove helpful to you. Finally you can ICQ me on: 28785646
6.) Credits I'd like to thank the following, without whose help, I would never have made it to this point:
- Bob Church - the only person who knows more than anyone else about the hardware/software issues - he wrote all the loaders and TM software, and developed the new digital chips that are quite simply amazing. If you haven't got them, goto his site and order them!
- Mystic, Cowboy and Buzz, who helped me enormously in developing Foxy, and in doing so, helped me understand a lot more about TM hardware and software issues.
- A hell of a lot of people who've conversed with me in the newsgroups and via e-mail over TM related problems.
- Baileys Original Irish Cream
- The patient who cancelled his appointment today